1. Overview
1.1 Synopsis
abuseipdb -C <IP> [-d <DAYS>] [-v [-l <LIMIT>] ] [-o <FORMAT>] [-t <TIMEOUT>]
abuseipdb -K <NETWORK> [-d <DAYS>] [-l <LIMIT>] [-o <FORMAT>] [-t <TIMEOUT>]
abuseipdb -R <IP> -c <CATEGORIES> -m <MESSAGE> [-o <FORMAT>] [-t <TIMEOUT>]
abuseipdb -V <FILE> [-o <FORMAT>] [-t <TIMEOUT>]
abuseipdb -E <IP> [-o <FORMAT>] [-t <TIMEOUT>]
abuseipdb -B [-l <LIMIT>] [-s <SCORE>] [-o <FORMAT>] [-t <TIMEOUT>]
abuseipdb -L | -G  | -h | --version
1.2. Options
| option | Description |
|---|---|
| -h, --help | Prints the current help. |
| -G, --config | Prints the current config. |
| -L, --list | Prints the list report categories. |
-C, --check IP |
Performs a check request for the given IP address. A valid IPv4 or IPv6 address is required. |
-d, --days DAYS |
For a check or check-block request, defines the maxAgeDays. Min is 1, max is 365, default is 30. |
-R, --report IP |
Performs a report request for the given IP address. A valid IPv4 or IPv6 address is required. |
-V, --bulk-report FILE |
Performs a bulk-report request sending a csv file. A valid file name or full path is required. |
-E, --clear IP |
Remove own reports for the given IP address. A valid IPv4 or IPv6 address is required. |
-K, --checkblock NETWORK |
Performs a check-block request for the given network. A valid subnet (v4 or v6) denoted with CIDR notation is required. |
-c, --categories CATEGORIES |
For a report request, defines the report category(ies). Categories must be separate by a comma. Some catgeries cannot be used alone. A category can be represented by its shortname or by its id. Use abuseipdb -L to print the categories list. |
-m, --message MESSAGE |
For a report request, defines the message to send with report. Message is required for all report requests. |
| -B, --blacklist | Performs a blacklist request: get a list of reported IPs. |
-l, --limit LIMIT |
For a blacklist request, defines the limit (default is 1000). For a check request with verbose flag, sets the max number of last reports displayed (default is 10). For a check-block request, sets the max number of IPs displayed (default is 0 mean no limit). |
-o, --output FORMAT |
Defines the output format for API requests. Default is a colorized report, possible formats are json or plaintext. Plaintext option prints partial response (blacklist: IPs list, check or report: confidence score only, check-block: reported IP list with confidence score, bulk-report: number of saved reports, clear: number of deleted reports). |
-s, --score SCORE |
For a blacklist request, sets the confidence score minimum. The confidence minimum must be between 25 and 100. This parameter is subscriber feature (not honored otherwise, allways 100). |
-t, --timeout TIMEOUT |
Define the timeout in API request and overwrite the value defined in conf.ini or local.ini. Timeout is expressed in milliseconds. |
| -v, --verbose | For a check request, display additional fields like the x last reports. Max number of last reports is defined in config. This increases request time and response size. |
| ---version | Prints the current version. |
1.3. Report categories
For report and bulk-report, you must define one or more report category. Some categories, for example ssh (22), cannot be used alone.
For report command, a category can be represented by its shortname or by its id. When you use the bulk-report command, you must use the id.
Categories list must be separate by a comma. For report command, categories list may have no quote (18,22). When using bulkreport, categories list requires double quotes to include commas ("18,22").
You can print the categories list with:
abuseipdb -L
# or
abuseipdb --list
Here is the full Categories list:
| ShortName | Id | Full name | Can be alone? |
|---|---|---|---|
| dns-c | 1 | DNS Compromise | true |
| dns-p | 2 | DNS Poisoning | true |
| fraud-orders | 3 | Fraud Orders | true |
| ddos | 4 | DDoS Attack | true |
| ftp-bf | 5 | FTP Brute-Force | true |
| pingdeath | 6 | Ping of Death | true |
| phishing | 7 | Phishing | true |
| fraudvoip | 8 | Fraud VoIP | true |
| openproxy | 9 | Open Proxy | true |
| webspam | 10 | Web Spam | true |
| emailspam | 11 | Email Spam | true |
| blogspam | 12 | Blog Spam | true |
| vpnip | 13 | VPN IP | false |
| scan | 14 | Port Scan | true |
| hack | 15 | Hacking | true |
| sql | 16 | SQL Injection | true |
| spoof | 17 | Spoofing | true |
| brute | 18 | Brute-Force | true |
| badbot | 19 | Bad Web Bot | true |
| explhost | 20 | Exploited Host | true |
| webattack | 21 | Web App Attack | true |
| ssh | 22 | SSH | false |
| iot | 23 | IoT Targeted | true |
1.4. Output format
By default, all API commands (check, bulk-check, report, bulk-report, clean and blacklist) print a colorized report in terminal.
You can change the output format using the -o |--output FORMAT parameter. Format parameter accepts json or plaintext as value.
json format prints the full API response. If set, the --limit parameter in check or check-block command is ignored (apply only to number of reports/IPs displayed in terminal).
plaintext format prints partial response:
| Command | Plaintext output |
|---|---|
| blacklist | IPs list (no confidence score), one IP per line |
| check | confidence score |
| report | confidence score |
| check-block | reported IPs list with confidence score (space separated), one IP/score per line |
| bulk-report | number of saved reports |
| clear | number of deleted reports |
2. How to
As said on abuseipdb, ip
127.0.0.1is a private IP address you can use for check/report api testing. Make sure you do not blacklist an internal IP on your server, otherwise you won't have a good day!
2.1 Check a single IP address
You can check a single IP address using the --check | -C command.
2.1.1 Check Synopsis
abuseipdb -C <IP> [-d <DAYS>] [-v ] [-l <LIMIT>] [-t <TIMEOUT>]
abuseipdb --check <IP> [--days <DAYS>] [--verbose ] [--limit <LIMIT>] [--timemout <TIMEOUT>]
You must pass a valid IPv4 or IPv6 as argument.
Response does not include last reports and country name by default (number or reports and country code only). You can display last reports and country name with the -v | --verbose flag.
--verboseoption increases request time and response size.
Displayed reports are currently limited to 10. You can change this value with the -l | --limit flag in your command.
By default, the last reports are checked on last 30 days, you can increase this number to 365 (min is 1) with the --days | -d parameter.
Like in any API request, you can overwrite the default timeout value (expressed in milliseconds) with the -t | --timeout option.
2.1.2 Check Usage
Check the ip 127.0.0.1 (default is on last 30 days):
abuseipdb -C 127.0.0.1
# or
abuseipdb --check 127.0.0.1
Check the ip 127.0.0.1 in last 365 days:
abuseipdb -C 127.0.0.1 -d 365
# or
abuseipdb --check 127.0.0.1 --days 365
Check the ip 127.0.0.1 and display additional infos with verbose flag and a timeout of 5 seconds:
abuseipdb -C 127.0.0.1 -v -t 5000
# or
abuseipdb --check 127.0.0.1 --verbose --timeout 5000
Check the ip 127.0.0.1, display additional infos with verbose flag and set the limit of last reports displayed to 20:
abuseipdb -C 127.0.0.1 -v -l 20
# or
abuseipdb --check 127.0.0.1 --verbose --limit 20
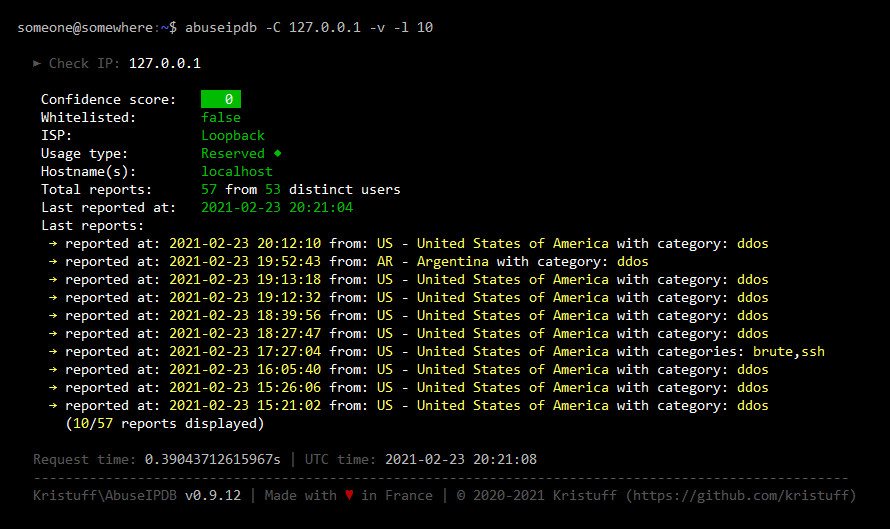
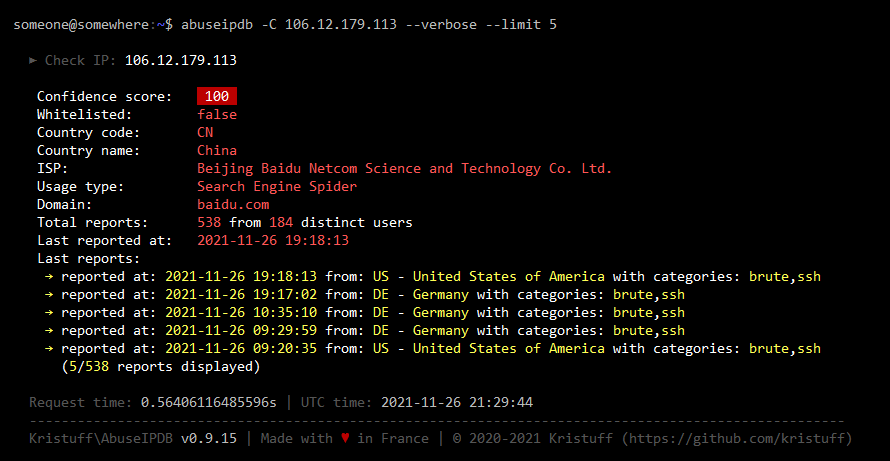
Here are sample outputs for this command (Click to see screenshots):
2.2 Check an IP block
You can check an IP block address using the --check-block | -K command.
2.2.1 Check-block Synopsis
abuseipdb -K <NETWORK> [-d <DAYS>] [-t <TIMEOUT>]
abuseipdb --check-block <NETWORK> [--days <DAYS>] [--timemout <TIMEOUT>]
The check-block command accepts a subnet (v4 or v6) denoted with CIDR notation as argument.
By default, the last reports are checked on last 30 days, you can increase this number to 365 (min is 1). Set the --days | -d flag in your command.
Like in any API request, you can overwrite the default timeout value (expressed in milliseconds) with the -t | --timeout option.
2.2.2 Check-block Limits
Due to the depth & breath of the these searches, the range of the parameters is capped by plan tier.
For most use cases, /24 is enough to an entire network. Many autonomous systems will sometimes have blocks of /20. Some of the largest autonomous systems will have blocks of /18 or /17.
| Field | Standard | Basic Subscription | Premium Subscription |
|---|---|---|---|
| network | Up to /24 | Up to /20 | Up to /16 |
| maxAgeInDays | Up to 30 | Up to 60 | Up to 365 |
Exceeding a parameter limit will raise an error (402 Payment Required).
2.2.3 Check-block Usage
Check the block ip 127.0.0.1 (default is on last 30 days):
abuseipdb -K 127.0.0.1/24
Check the block ip 127.0.0.1 in last 15 days:
abuseipdb -K 127.0.0.1/24 -d 15
# or
abuseipdb --check-block 127.0.0.1/24 --days 15
Check the block ip 127.0.0.1 in last 15 days and display only 10 IPs:
abuseipdb -K 127.0.0.1/24 -d 15 -l 10
# or
abuseipdb --check-block 127.0.0.1/24 --days 15 --limit 10
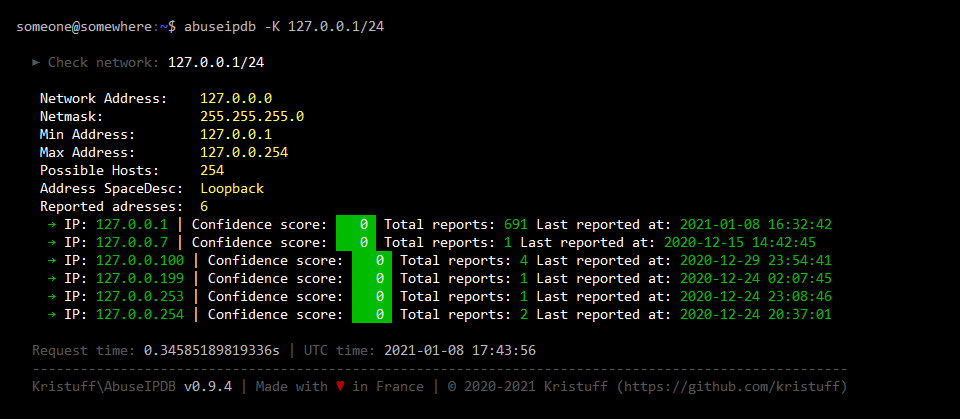
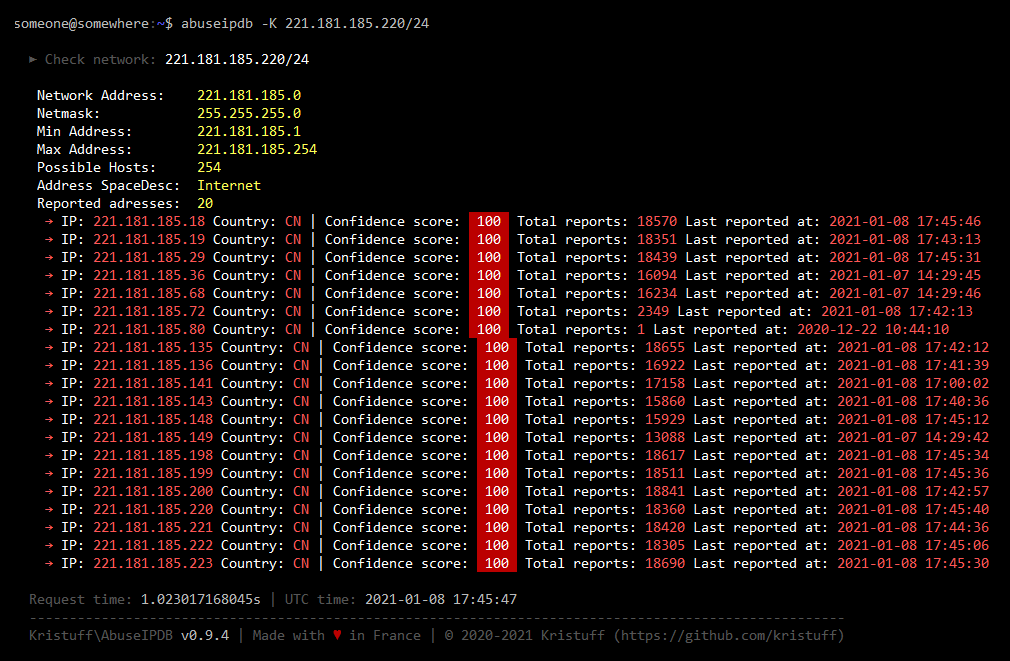
Here are sample outputs for this command (Click to see screenshots):
2.3 Report a single IP address
You can report a specific IP address using the --report | -R command.
2.3.1 Report Synopsis
abuseipdb -R <IP> -c <CATEGORIES> -m <MESSAGE> [-t <TIMEOUT>]
abuseipdb --report <IP> --categories <CATEGORIES> --message <MESSAGE> [--timemout <TIMEOUT>]
The report command accepts a single IP address (v4 or v6) as parameter.
You must set :
valid report categories (see Report Categories)
a message. Message could be log lines or a custom message. By default, the
reportcommand checks for email address in message that are replaced by*. You can also configure a white list for IPs/domain names you want to remove too. (see Setup self IPs).
Like in any API request, you can overwrite the default timeout value (expressed in milliseconds) with the -t | --timeout option.
2.3.2 Reports Usage
Report the ip 127.0.0.1 for ssh and brute with message ssh brute force message using categories shortname:
# arguments order does not matter, these two lines do the same
abuseipdb -R 127.0.0.1  -c ssh,brute  -m "ssh brute force message"
abuseipdb  -m 'ssh brute force message' -c ssh,brute  -R 127.0.0.1
Report the ip 127.0.0.1 for ssh and brute with message ssh brute force message using categories id:
abuseipdb -R 127.0.0.1 -c 22,18 -m "ssh brute force message"
Here are sample outputs for this command (Click to see screenshots):

2.4 Bulk report IP addresses
Instead of reporting IPs individually, you may compile a CSV of reports. This helps reduce bandwidth on both sides.
Note: The abuse confidence score of a IP reported this way is not immediately calculated.
You can report many IP by sending a CSV file using the --bulk-report | -V.
2.4.1 Bulk-Report Synopsis
abuseipdb -V <PATH> [-t <TIMEOUT>]
abuseipdb --bulk-report <PATH> [--timemout <TIMEOUT>]
This commands takes the file name/path as unique argument. The CSV file must be under 2 MB and less than or equal to 10,000 lines, including the headings.
Important: the CSV file is send AS IS, you need first to remove sensitive data in comments yourself.
Like in any API request, you can overwrite the default timeout value (expressed in milliseconds) with the -t | --timeout option.
2.4.2 CSV Format
Headings required, any order.
IP— A valid IPv4 or IPv6 IP address.Categories— At least one category ID. Comma separated for multiple categories. See: Report Categories. Categories must be enclosed if there is more than one.ReportDate— Date and time of the attack or earliest observance of attack. Any format thatstrtotime()can process is permitted. However, it's strongly recommend a timezoned format such ISO 8601 e.g. 2017-09-08T10:00:37-04:00. A time lacking a timezone is assumed to be in UTC.Comment— A description of the attack. Truncated after 1,024 characters (bytes). The Comment must be enclosed in double quotes (") to include commas (,) and new line separators (\n, \r, \r\n). A blacklash () is needed to escape the enclosure. It does not escape itself.
Here is an example of valid content:
IP,Categories,ReportDate,Comment
89.205.125.160,"18,22",2018-12-18T10:00:37-04:00,"Failed password for invalid user odoo from 89.205.125.160 port 39121 ssh2"
123.183.209.136,"18,22",2018-12-18T11:25:11-04:00,"Did not receive identification string from 123.183.209.136 port 57192"
197.156.104.113,"14,15,18,11,10,21",2018-12-18T16:10:58+04:00,"[SMB remote code execution attempt: port tcp/445]
in blocklist.de:'listed [pop3]'
in SpamCop:'listed'
in sorbs:'listed [web], [spam]'
in Unsubscore:'listed'
*(RWIN=8192)(04:10)"
2.4.3 Bulk-Report Usage
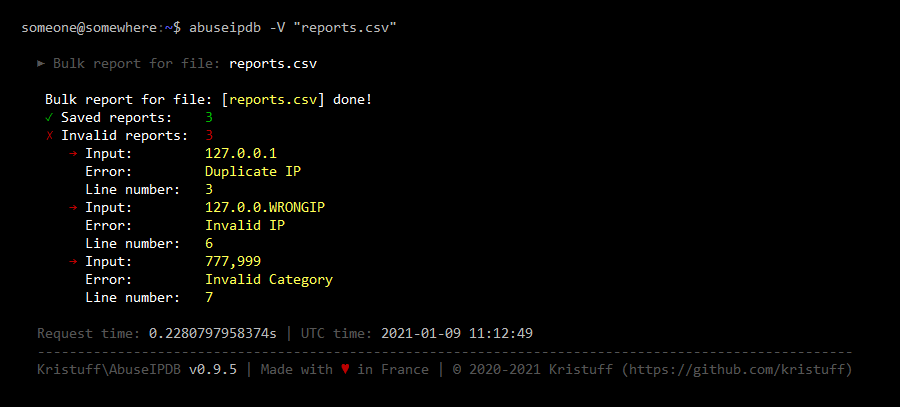
Suppose a file named reports.csv, located in the current directory, with the following content:
IP,Categories,ReportDate,Comment
127.0.0.1,"18,22",2021-01-08T10:00:37-04:00,"test api"
127.0.0.1,"18,22",2021-01-08T10:00:37-04:00,"test api DUPLICATE IP"
127.0.0.2,"18,22",2021-01-08T10:00:37-04:00,"test api"
127.0.0.3,"18,22",2021-01-08T10:00:37-04:00,"test api"
127.0.0.WRONGIP,"18,22",2021-01-08T10:00:37-04:00,"test api with WRONG IP"
127.0.0.100,"777,999",2021-01-08T10:00:37-04:00,"test api with WRONG categorgies"
The file contains 3 error lines for testing (duplicate IP, wrong IP and wrong categories).
Send the csv file reports.csv:
abuseipdb -V "reports.csv"
# or
abuseipdb --bulk-report "reports.csv"
Here is a sample output for this command (Click to see screenshot):
2.5 Remove own reports for an IP address
You can delete reports for a specific address from YOUR account using the --clear | -E command. It cannot delete another user's reports.
2.5.1 Clear Address Synopsis
abuseipdb -E <IP> [-o <FORMAT>] [-t <TIMEOUT>]
abuseipdb --clear <IP> [--output <FORMAT>] [--timemout <TIMEOUT>]
The clear command accepts a single IP address (v4 or v6) as parameter.
The only property it returns is the number of reports deleted from your account.
Like in any API request, you can overwrite the default timeout value (expressed in milliseconds) with the -t | --timeout option.
2.5.2 Clear Address Usage
Remove own reports for IP 127.0.0.1:
abuseipdb -E 127.0.0.1
Here are sample outputs for this command (Click to see screenshots):

2.6 Download IP blacklist
You can download a blacklist using the --blacklist | -B command.
The blacklist is the culmination of all of the valiant reporting by AbuseIPDB users. It's a list of the most reported IP addresses.
2.6.1 Blacklist Synopsis
abuseipdb -B [-l <LIMIT>] [-s <SCORE>] [-o <FORMAT>] [-t <TIMEOUT>]
abuseipdb --blacklist [--limit <LIMIT>] [--score <SCORE>] [--output <FORMAT>] [--timemout <TIMEOUT>]
2.6.2 Blacklist Caching
The blacklist response for a given query is cached for 1, 6, or 24 hours depending on your plan (see table below).
| Plan | Hours Cached |
|---|---|
| Individual | 24 |
| Basic Subscription | 6 |
| Premium Subscription | 1 |
2.6.3 Plaintext Blacklist
You can print the blacklist like any reports, or may want to receive the IP list in plain text like this:
5.188.10.179
185.222.209.14
95.70.0.46
191.96.249.183
115.238.245.8
122.226.181.164
122.226.181.167
If you prefer a simple newline-separated plaintext response, set the --output plaintext | -o plaintext flag in your command.
2.6.4 Blacklist Limit
To conserve bandwidth, the number of IP addresses included in the list is capped to 10,000. All users can set it between 1 and 10,000.
Subscribers, both basic and premium, can overcome this limit. If you are a subscriber and want to the full list, set the limit parameter to an absurd number like in the example (9,999,999). However, this large of a request may take a while, and firewall software such as csf may have trouble importing rules for over 10,000 IPs.
The default limit currently defined is 1,000, you can change limit in your command with --limit | -l flag.
2.6.5 Confidence Score
The default confidence score is 100, you can change mimimum condidence score in your command with --score | -s parameter. Score must be between 25 to 100. The score is a subscriber feature and is not honored otherwise.
The abuseConfidenceScore parameter is a subscriber feature. This is because custom blacklists take more juice to generate on-demand. Should your subscriber status lapse, an error response will not be thrown. Rather, the response will degrade gracefully to the simple blacklist. This works nicely with existing firewall software.
2.6.6 Blacklist Usage
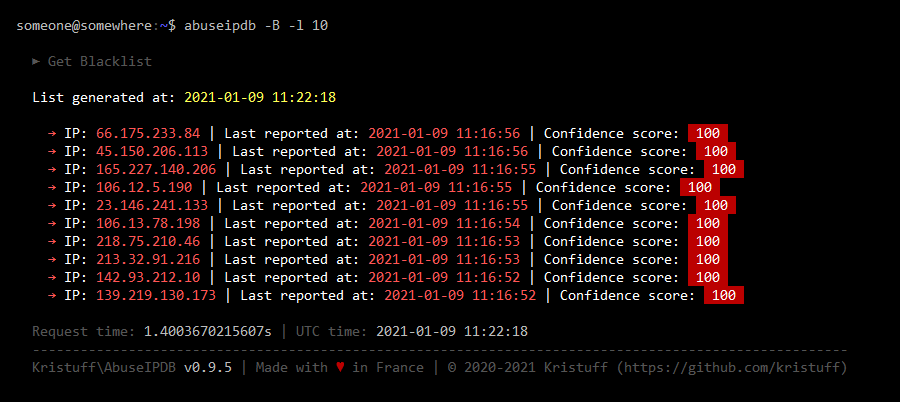
Get a blacklist of 10 items:
abuseipdb -B -l 10
#or
abuseipdb --blacklist --limit 10
Here are sample outputs for this command (Click to see screenshots):
Get a blacklist of 10 items in plain text:
abuseipdb -B -l 10 -o plaintext
#or
abuseipdb --blacklist --limit 10 --output plaintext
Here are sample outputs for this command (Click to see screenshots):

Get a blacklist of 200 items with minimum confidence score of 75 :
abuseipdb -B -l 200 -s 75
#or
abuseipdb --blacklist --limit 10 --score 75
Get a blacklist of 10000 items in plain text and save it to a file named
list.txt:abuseipdb -B -o plaintext -l 10000 > list.txt # or abuseipdb --blacklist --output plaintext --limit 10000 > list.txt